Saturday 16 July 2016

engine deck part 2

Hi all again!

As I promised before here comes the second part of Pete Hamann's 3D printed engine deck's preview.
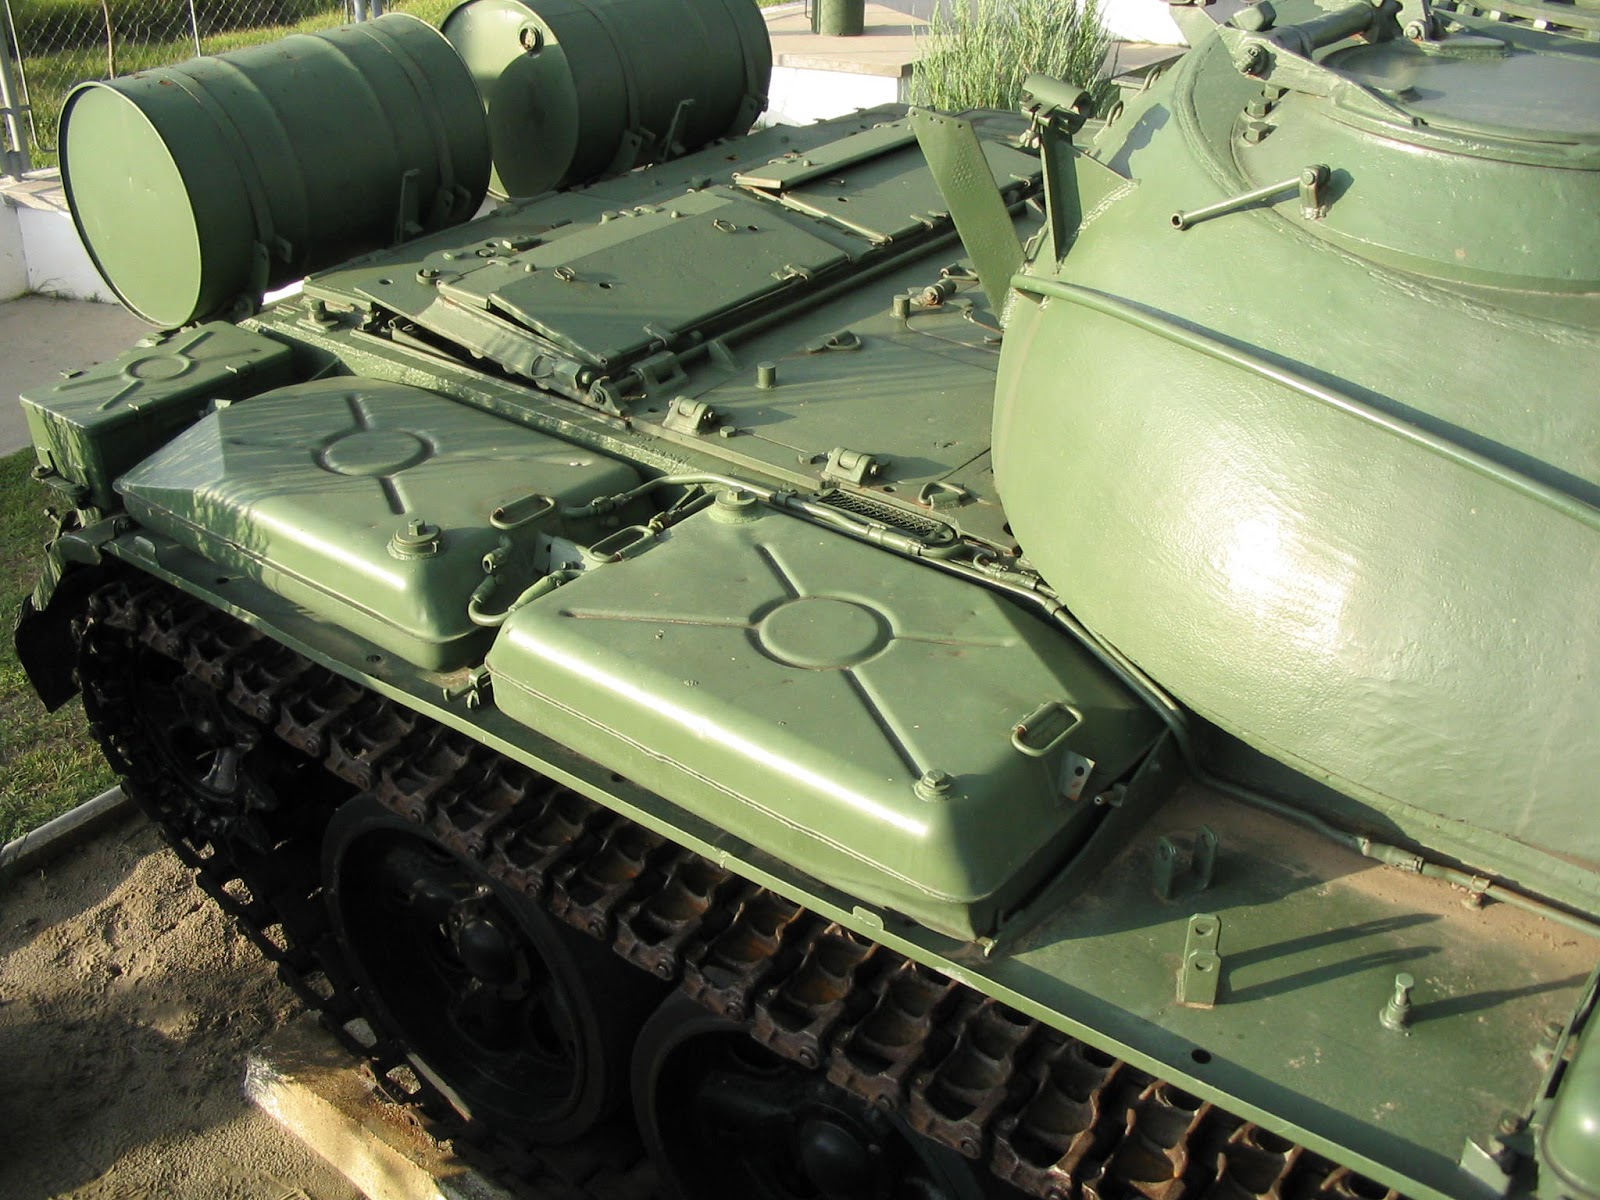
Shell we start with fitting. Unfortunately, the fitting side under the turret to the Tamiya hull is not perfect. I don't know Pete's printed part too long, or the Tamiya version is too short to the original, however this part is not fitting. BUT, very easy to solve this problem. As you can see, the problem is not really coming out under the turret (which part is always under cover) but because the printed part too long, the "cast" part top of the exhaust is not covering well that look at the photos.


After fitting, I removed the engine deck lockers. I did not because it's not accurate, I did because I used only this printed part, and was much easier to reproduce from Tamiya plastic. One more thing. I cut out the grill's cover on the top right site. Watching original photos, looks like it was always open (and looks much cooler ;) ) Than I cut a left over part grill from a King Tiger and glued to the bottom side. As you can see on photo, I've made a mistake and over cut the 3D part, but as i mentioned before it's all under the turret :)


When it was on it's place I just made all the small details, like hooks, bolts and the engine deck opener rod. and finally all got it's shape.


Where you can see green signs there is already good, where you can see red, that's part I have to fix it.


What can I say after this 3D printed part? Wish I could order the other part as well (second half of the engine deck) This is the most accurate part in the whole kit. The plastic is good, easy to work with, the details are superb. I'm sure the way is open to the new technique and I'm sure it wasn't my last piece of 3D printed one. Thanks a lot to Pete Hamann for this, and I hope I can build more from yours!

And here comes the final photo:


NOTE: I did not get this 3D part as a gift. I bought it. The opinion what I wrote it above is mine, and it's definitely not a commercial!

Thanks
Gergo

Monday 11 July 2016

engine deck

As I promissed before to Pete Hamann, here comes a small preview about his 3D printed engine deck.
First you could ask me, why I need to change anything in my T-55 when it's nearly ready. The answer is very simple, few weeks ago new information came about my beast. The information was "official" from a veteran soldier of  Serbian army, who confirmed the vehicle what I'm currently building, is a Polish made, and not a Czech made as I thought before. Between the two version there are minor differences, specially if you are standing on the ground and watching it from side view. However if you are making a modell, and watching it from top view, you clearly capable see differences between engine decks. And here we now, the minor change. The Czech version has different hatch of the engine deck.

                                                                POLISH VERSION

The two doors are opening to the end of the tank!

                                                              CZECH VERSION
The two doors are opening different way! One is opening to the end of the tank, and the second door is opening to the side of the tank!

On the market there is no available upgrade set only the Blast models poor quality Czech made version. But nothing for Polish. That is a sad thing because a thousands of T-55's made by Polish.

Now I have a chance to work with Pete Hamann's 3D printed version.


For first sight I have to say impressive! Of course there is more after-work with it, because of the method of printing. The surface of the plastic is too rude, but only a small grinding and it's solved. now, look at the mistakes.
In my opinion, Pete's company doesn't need to print with deck the door's holder pins. Those are not curved as needed to, but square one. It's absolutely not a problem, if your doors are open when you finished your modell.


Unfortunately in my printed engine deck, there is a printing mistake also. The left side fixing hook (picture below) Which is not a problem to me, because I wanted to change it anyway to P.E. (green color=good, red color=bad)


And finally there is another mistake (which is also not a mistake, only not 100% fit the side of the 3D printed version the Tamiya's hull. But with small work you can fix that problem easily.


CONCLUSION

This small update is a niche! With this little help, you can do accurate version of Spring 1968 Prague, Serbia 1995, but I saw many Polish version in Iraq or many of them in African service. The quality is on the top, and if Pete will change the mistakes what I just wrote above, that will be the best available upgrade set in market, not just even for Tamiya version, but Takom also. I'm really upset now I did not Order from Pete a full engine deck only the doors, because I said I have Blast models grills' part engine deck, but now as I see this kind of quality I wish I could order that too. I'm sure this niche unit will make you easy to upgrade your T-55 in the very best way!


The second part of review, including the built in part will follow the end on this week!

Cheers
Gergo

Sunday 12 June 2016

And.... here we are, ready to paint!

Hi lads!


Here is my T-55 ready to paint. I spent nearly 6 months every day 2 hours to this Tamiya kit. A full Aber P.E. including boxes, fenders, gun, etc. The 12.7DSchK came from RB, ammo box is from Voyager left over. I had to build fully scratch the engine deck. The only peace came from Blast models but that is the worst resin what I've ever build from. So what you see there is fully scratch. I know this is not the best T-55, and I know many other parts could make more nice, but guys I tell you the truth, I start to sick of it! This kit is a nightmare. The Aber is not accurate, the Masterclub track was a piece of SH..., oh yeah, thanks to Masterclub to write me back to my complaint, now I know why I will never ever again buy your products ;) But finally I'm here, ready to paint it :D And this feeling is awesome!

Helló ismét!

Már itt is vagyunk, hogy rohan az idő, 8 év csak úgy huss el is szalad :D Na de félre a tréfát, az utóbbi 6 hónapban szinte minden nap beleöltem 2 órát a Tamiya ősrégi makettjébe. mondhatnám, hogy megérte, de hazudnék. Amikor a T-72 elkészült, sok sok órát beleölve, nagyon boldog voltam, mert sikerült egy  (számomra) hibátlan építést csinálnom. Sajnos ennél a makettnél ez nem mondható el. Minden ami problémaként jelentkezhet ezen a maketten az jelentkezett is. Az Aber dobozokból két készletet kellett használnom, hiszen az Aber Lengyel verzióhoz ad maratást nem a Cseh verzióhoz, így sok doboz duplán került fel. A csatok, de még a sárvédő is durván el van méretezve, a lámpák rács házát 3 szor kellett újra csinálnom, a masterclub lánc egy rakás szemét volt, és akkor még a Blast modell átalakítójáról egy szót sem ejtettem. A leg hitványabb műgyanta amivel valaha dolgom volt! Nem vicc, egy mm pontos öntés nem sok annyi nem volt rajta! Az egyetlen ami tökéletesen passzolt oda ahova kellett az az RB géppuska csöve. A legolcsóbb és leg hibátlanabb darab :D Ezen kívül minden házilag készült, a motortér, az össze kábelozás, a hegesztések, és persze a sár fogó lemez a fronton. Ez utóbbi fotó alapján lett így kialakítva. Nagyon remélem a festés innentől már csak a jól megérdemelt hab a tortán, mert eddig a süti annyira nem ízlik, de héjjj, 8 év után festésre kész, azért ez is valami :D


Saturday 4 June 2016

T-64 from USSR

Hi All!

My friend Balazs Kobolak made a T-64 He asked me to take some photo and share on our blog. I hope you like it!? Most of the big part are only fixed by bluetech, so not perfectly match the plastic ;)

Hello mindenki!

Barátom Kobolák Balázs kért meg rá, fotózzam körbe frissen elkészült T-64 ét. A legtöbb nagyobb alkatrész csak bluetch-el van fixélva, így előfordul, hogy nem tökéletes az illesztkedés a képen. Remélem tetszik!? ;)


Tuesday 22 March 2016

let's give a shape to the old lady

Hello Everybody!

It was a bit too much of silence in the last few weeks. That's because I am a daddy now, and because I couldn't make any progress on my T-62. Which is not really true. I have ready the bags on it, but still waiting to the base from the carpenter. So till the T-62 is on my shelf, I started to finish my old project, the T-55
First I thought, just finish the already 6 years ago started  kit, but than I realized I made some mistakes some years ago. SO I decided I will buy another Tamiya kit to fix those mistakes and a new Aber P.E. sets. Still loads of work left, and the boxes are not ready yet rather, but i'm on the right way now ;)

Helló mindenki!

Talán egy picit túl hosszú idő telt már el az utolsó írásom óta, de ez annak is köszönhető, hogy nem haladtam a T-62 vel, ami így nem igaz, hoszen a zsákok készen vannak, ám sajnos a dioráma alapja még nem érkezett meg az asztalostól. Szóval amíg a T-62 pihen a polcon, elővettem a T-55 projektemet. Először azt gondoltam, nagyon egyszerű dolgom lesz, hiszen korábban már majdnem mindent megcsináltam. Nos ez így nem igaz, sok hibát követtem el annó, s mivel a hibák javítása már körülményesebb lett volna mint egy új makett így egy bontott T-55 vásárlása mellett döntöttem. Illetve egy új szett Aber maratás. Még csak a dobozokat csináltam meg , azokat sem teljesen, de azt hiszem ez alkalommal jó irányba haladok ;)


Monday 15 February 2016

Fired ammunition is ready

Hi all!

I usually don't say to a product I like it or not, especially if I don't have any concerned in it. But I have to say I'm really happy to used the AK new Extreme metal set. I always use the Gunze colors to painting, but somehow the Gunze couldn't give back the right colors what I needed for. So here are the shells first with black base colors, then the extreme metals. There will be one more color over the aluminum which will be grey. Let's see the colors on photos.

Helló mindenki!

Általában nem mondom azt egy márkára hogy szeretem vagy nem. De azt kell mondjam nagyön örülök, hogy az AK új extrém fém színeit használhattam. Sajnos a gunze hasonló színei nem tudják visszaadni azt amire szükségem volt. Tehát jöjjenek a képek, először a fényes fekete alapozóval, majd a fém színekkel. Lesz még egy szín az alumínium szín felett, ez pedig szürke lesz majd, de először a fotók.


Saturday 13 February 2016

bags

Hi all!

Today I finished the bags' shape. It was a very easy job, needed only water, wood cement, an tissue. The base was the A+B putty, than just covered with the tissue. That's all, the texture is ready, let's see how we can paint it.


Helló!

Ma sikerült befejeznem a zsákokat. Ehhez nem volt másra szükség csak papírzsebkendőre és fa ragasztóra, no meg némi vízre. Az alap a már korábban elkészített A+B putty-s műgyanta, amit ezzel a zsebkendővel borítottam be. Lássuk milyen lesz a festése.


Monday 8 February 2016

90%

Hello all!

I think I've never been so close to finish to this T as now. I'm not 100%  satisfied by the result of the dried mud and wet mud combination, but still working on it. I needed to stop in this 90% stage because I want to see how looks like together the base and the bags with figure or figures. The final touches comes after this moment. Until that, here comes the photos of the current stage.

Helló mindenki!

Azt hiszem sosem jártam még ilyen közel ahhoz hogy befejezhesem ezt a 62-est. Nem vagyok 100%-ig elégedett azzal ahogyan a száradt sár és a nedves sár egymással összhangban vannak, de még dolgozom rajta. Meg kellett hogy álljak ebben az állapotában a koszolásnak, mert a végső simításokat csak akkor akarom majd elvégezni amikor a dioráma alap is elkészült, illetve a zsákok és a figura is a helyére kerültek. De addig is íme pár fotó az aktuális állapotról.